
This post is about creating and implementing a custom Dockable Window in Revit® Add-Ins Application. So, what exactly is a Dockable Window? How to make like a ” Project Browser, Properties ….window” ? … Let’s explore this, I will be using Revit v2020 and Visual Studio v2017 for this sample project.
We will reuse the previous WPF Tutorial as our project basic setup, and that will be modified and upgraded as a Dockable Window. Dockable Window is also called Dockable Dialog, Dockable Page, Dockable Pane, Dockable Panel (maybe some more…). Anyway, open the previous WPF Tutorial project and if you don’t have it yet, you can download it from here.
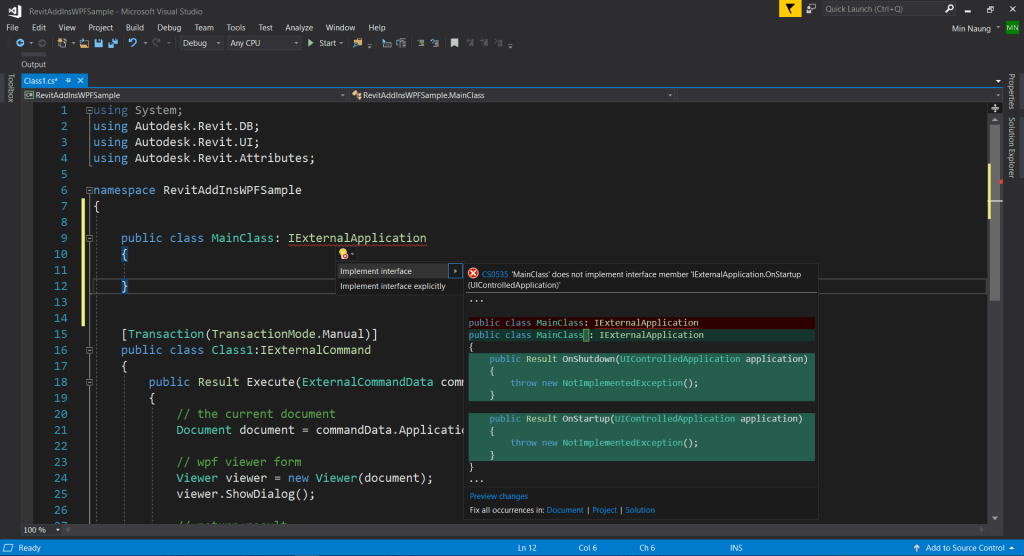
Whenever you are ready, add a new class named MainClass and implements the IExternalApplication interface (figure 1.1). The IExternalApplication interface has two abstract methods, OnStartup() and OnShutdown(), Revit calls OnStartup() when it starts, and OnShutdown() when it closes. The Return values are the status of the application whether has been Cancelled, Failed or Succeeded.

When you hover on IExternalApplication interface, you can see Show potential fixes a blue link as shown in figure 1.1. Click on it and you will see another pop-up just like shown in figure 1.2, and click on the Implement interface. Now we have done implementing the IExternalApplication interface in our application (figure 1.3).

Our application command buttons will look something like this, the first button is to register the Dockable Window to the current Revit Application session. The latter is to show the registered Dockable Window in the current Document.

So, let’s create these two command classes in our application. We have already discussed about the creating Command Class in the previous WPF Tutorial, anyway. Rename our working class to “MainClass” (highlight in blue), remove “Class1 Command Class” from the previous sample and write two new classes: Register and Show as shown in figure 1.4 .

To create the command button icons, you gonna need these buttons’ icon images too so download it from here.

figure – i1 
figure – i2 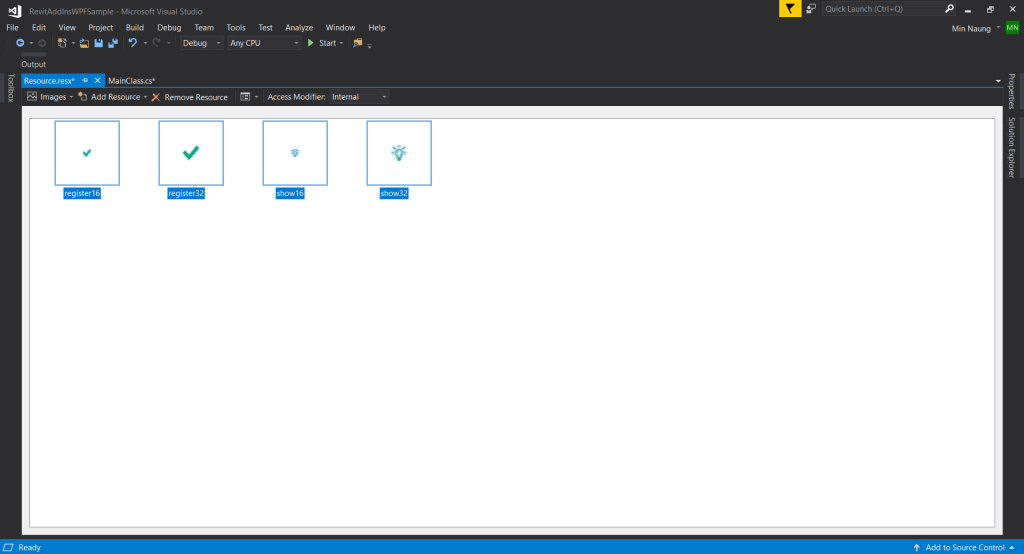
figure – i3 
figure – i4 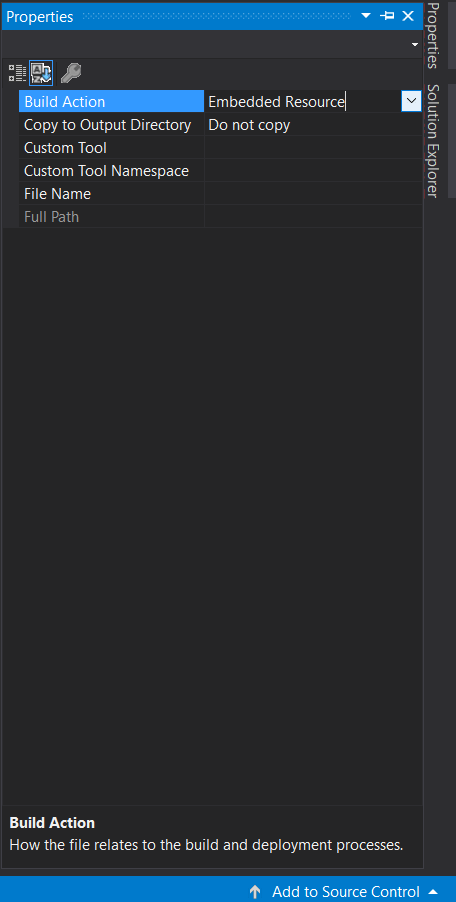
figure – i5
What is shown in figure – i1 to i5 is that to add four images as command icon files to our project.
- figure – i1 : Right click on the project > Add > New Item…
- figure – i2 : Choose Resources File > Name it “Resource.resx“
- figure – i3 : Drag and drop image files to Resource.resx
- figure – i4 : Select the image files from Solution Explorer
- figure – i5 : Right click > Properties > Build Action value to Embedded Resource
Add some additional references from the System for Assembly, Stream and Image libraries (figure 1.5).

And to write a method to handle the image data. Named GetResourceImage, to collect our image files that we just embedded in this current assembly resource file. Method includes two parameters : (Assembly) an assembly , (string) name of an image and returns an ImageSource object. (figure 1.6)

// get embedded images from assembly resources
        public ImageSource GetResourceImage(Assembly assembly, string imageName)
        {
            try
            {
                // bitmap stream to construct bitmap frame
                Stream resource = assembly.GetManifestResourceStream(imageName);
                // return image data
                return BitmapFrame.Create(resource);
            }
            catch
            {
                return null;
            }
        }
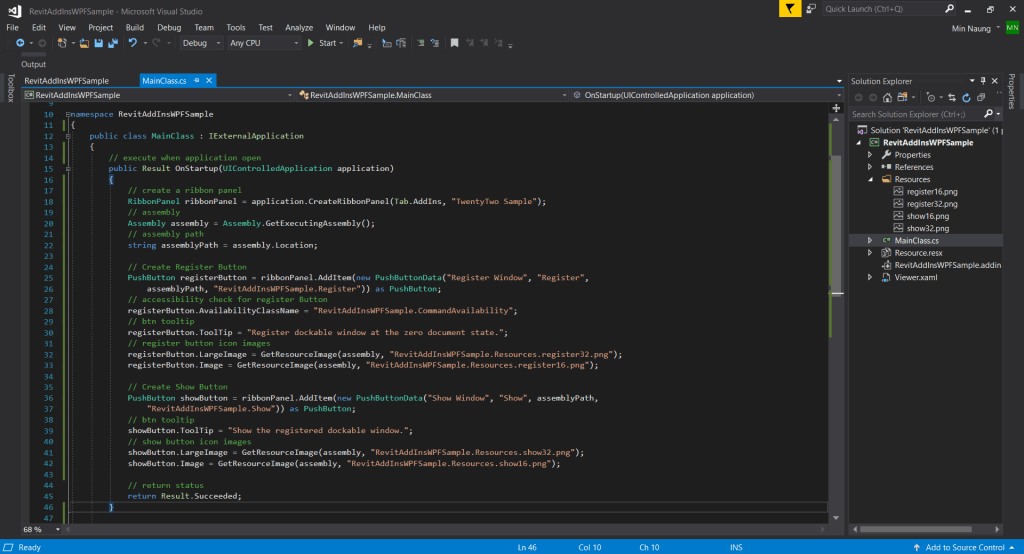
Next step is to create two Revit UI buttons, Register Button and Show Button, to attach to execute Register Command and Show Command respectively. In the OnStartup method, to do the following steps;
- Create a Ribbon Panel name “TwentyTwo Sample” under Revit Add-Ins Tab.
- Get current assembly path which is the location of this current project’s DLL file.
- Create a button for Register Command and add to the created “TwentyTwo Sample” panel.
- To make Register button only available at the zero document state (there is no active document) with button’s AvailabilityClassName property (explain below)
- Assign ToolTip and Images properties respectively.
- Create another button for Show Command and add to the created “TwentyTwo Sample” panel.
- Except for not including AvailabilityClassName property, the rest of the steps are pretty much the same as the Register button.
// execute when application open
        public Result OnStartup(UIControlledApplication application)
        {
            // create a ribbon panel
            RibbonPanel ribbonPanel = application.CreateRibbonPanel(Tab.AddIns, "TwentyTwo Sample");
            // assembly
            Assembly assembly = Assembly.GetExecutingAssembly();
            // assembly path
            string assemblyPath = assembly.Location;

            // Create Register Button
            PushButton registerButton = ribbonPanel.AddItem(new PushButtonData("Register Window", "Register",
                assemblyPath, "RevitAddInsWPFSample.Register")) as PushButton;
            // accessibility check for register Button
            registerButton.AvailabilityClassName = "RevitAddInsWPFSample.CommandAvailability";
            // btn tooltip
            registerButton.ToolTip = "Register dockable window at the zero document state.";
            // register button icon images
            registerButton.LargeImage = GetResourceImage(assembly, "RevitAddInsWPFSample.Resources.register32.png");
            registerButton.Image = GetResourceImage(assembly, "RevitAddInsWPFSample.Resources.register16.png");

            // Create Show Button
            PushButton showButton = ribbonPanel.AddItem(new PushButtonData("Show Window", "Show", assemblyPath,
                "RevitAddInsWPFSample.Show")) as PushButton;
            // btn tooltip
            showButton.ToolTip = "Show the registered dockable window.";
            // show button icon images
            showButton.LargeImage = GetResourceImage(assembly, "RevitAddInsWPFSample.Resources.show32.png");
            showButton.Image = GetResourceImage(assembly, "RevitAddInsWPFSample.Resources.show16.png");

            // return status
            return Result.Succeeded;
        }
As defined in the RevitAPI, ” IExternalCommandAvailability is an interface that should be implemented to provide the implementation for an accessibility check for a Revit add-in External Command “. So, here we check, is there any active/open document in the application and returns a Boolean value.
// external command availability
    public class CommandAvailability : IExternalCommandAvailability
    {
        // interface member method
        public bool IsCommandAvailable(UIApplication app, CategorySet cate)
        {
            // zero doc state
            if (app.ActiveUIDocument == null)
            {
                // disable register btn
                return true;
            }
            // enable register btn
            return false;
        }
    }

In Viewer.xaml, change the Window to Page tag as recommended in Revit API Developer Guide. Add Page tag properties such as d:Design Height, d:DesignWidth … and Border, RowDefinitions and two StackPanel tags for Document Name and ActiveView Name display and finally place the Treeview at Grid’s row number 2 (figure 1.9).
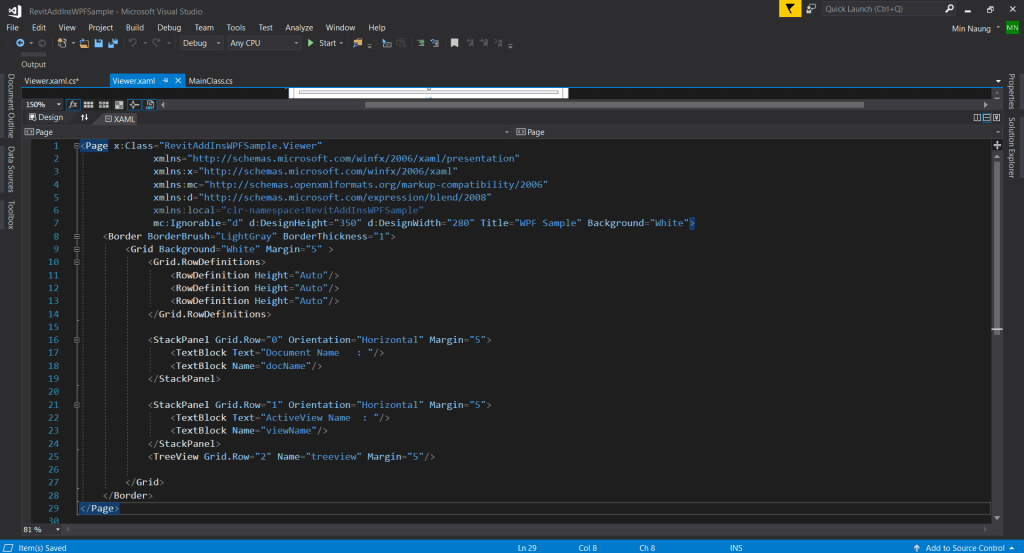
<Page x:Class="RevitAddInsWPFSample.Viewer"
             xmlns="http://schemas.microsoft.com/winfx/2006/xaml/presentation"
             xmlns:x="http://schemas.microsoft.com/winfx/2006/xaml"
             xmlns:mc="http://schemas.openxmlformats.org/markup-compatibility/2006"
             xmlns:d="http://schemas.microsoft.com/expression/blend/2008"
             xmlns:local="clr-namespace:RevitAddInsWPFSample"
             mc:Ignorable="d" d:DesignHeight="350" d:DesignWidth="280" Title="WPF Sample" Background="White">
    <Border BorderBrush="LightGray" BorderThickness="1">
        <Grid Background="White" Margin="5" >
            <Grid.RowDefinitions>
                <RowDefinition Height="Auto"/>
                <RowDefinition Height="Auto"/>
                <RowDefinition Height="Auto"/>
            </Grid.RowDefinitions>

            <StackPanel Grid.Row="0" Orientation="Horizontal" Margin="5">
                <TextBlock Text="Document Name   : "/>
                <TextBlock Name="docName"/>
            </StackPanel>

            <StackPanel Grid.Row="1" Orientation="Horizontal" Margin="5">
                <TextBlock Text="ActiveView Name  : "/>
                <TextBlock Name="viewName"/>
            </StackPanel>
            <TreeView Grid.Row="2" Name="treeview" Margin="5"/>

        </Grid>
    </Border>
</Page>
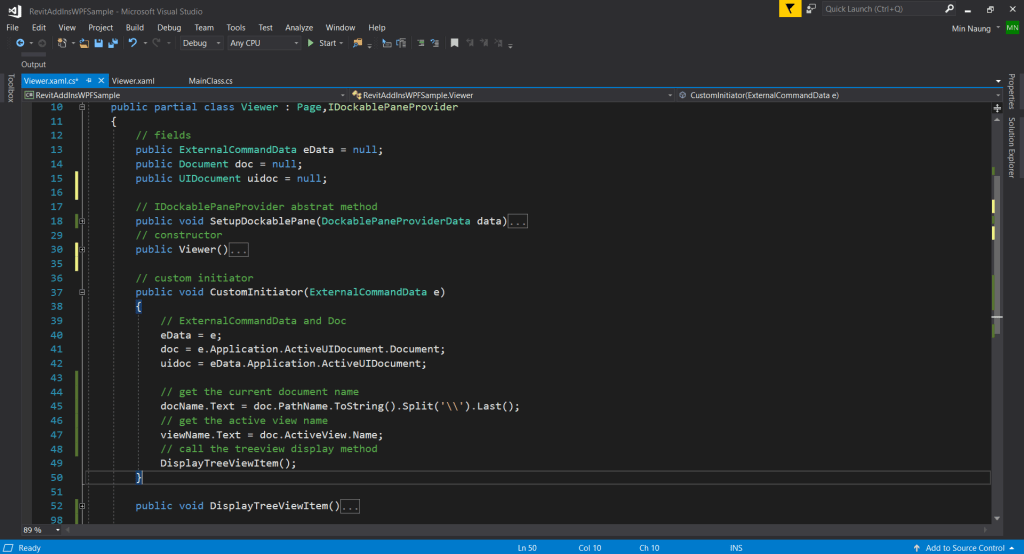
In our Viewer.xaml.cs class, implement the IDockablePaneProvider interface and its abstract method named SetupDockablePane. SetupDockablePane() method has one parameter of type DockablePaneProviderData, which is a container for information about our dockable window. And we’ll set FrameworkElement and InitialState of its properties (figure 1.10).

CustomInitiator method with the ExternalCommandData as a parameter. In this sample project, this CustomInitiator method is the key to establish the communication between our Dockable Window and the Document. For that to use ApplicationClassEvents such as Application.DocumentOpened, Application.ViewActivated … to called this method from our MainClass so that we will get the latest version of the current document every time Application’s Event(s) is(are) raised (figure 1.11).
using System;
using System.Collections.Generic;
using System.Linq;
using System.Windows;
using System.Windows.Controls;
using Autodesk.Revit.DB;
using Autodesk.Revit.UI;
namespace RevitAddInsWPFSample
{
    /// <summary>
    /// Interaction logic for Viewer.xaml
    /// </summary>
    public partial class Viewer : Page,IDockablePaneProvider
    {
        // fields
        public ExternalCommandData eData = null;
        public Document doc = null;
        public UIDocument uidoc = null;

        // IDockablePaneProvider abstrat method
        public void SetupDockablePane(DockablePaneProviderData data)
        {
            // wpf object with pane's interface
            data.FrameworkElement = this as FrameworkElement;
            // initial state position
            data.InitialState = new DockablePaneState
            {
                DockPosition = DockPosition.Tabbed,
                TabBehind = DockablePanes.BuiltInDockablePanes.ProjectBrowser
            };

        }


        // constructor
        public Viewer()
        {
            InitializeComponent();

        }
        // custom initiator
        public void CustomInitiator(ExternalCommandData e)
        {
            // ExternalCommandData and Doc
            eData = e;
            doc = e.Application.ActiveUIDocument.Document;
            uidoc = eData.Application.ActiveUIDocument;

            // get the current document name
            docName.Text = doc.PathName.ToString().Split('\\').Last();
            // get the active view name
            viewName.Text = doc.ActiveView.Name;
            // call the treeview display method
            DisplayTreeViewItem();
        }

        public void DisplayTreeViewItem()
        {
            // clear items first
            treeview.Items.Clear();

            // viewtypename and treeviewitem dictionary
            SortedDictionary<string,TreeViewItem> ViewTypeDictionary = new SortedDictionary<string, TreeViewItem>();
            // viewtypename
            List<string> viewTypenames = new List<string>();

            // collect view type
            List<Element> elements = new FilteredElementCollector(doc).OfClass(typeof(View)).ToList();

            foreach (Element element in elements)
            {
                // view
                View view = element as View;
                // view typename
                viewTypenames.Add(view.ViewType.ToString());
            }

            // create treeviewitem for viewtype
            foreach (string viewTypename in viewTypenames.Distinct().OrderBy(name => name).ToList())
            {
                // create viewtype treeviewitem
                TreeViewItem viewTypeItem = new TreeViewItem() { Header = viewTypename };
                // store in dict
                ViewTypeDictionary[viewTypename] = viewTypeItem;
                // add to treeview
                treeview.Items.Add(viewTypeItem);
            }

            foreach (Element element in elements)
            {
                // view
                View view = element as View;
                // viewname
                string viewName = view.Name;
                // view typename
                string viewTypename = view.ViewType.ToString();
                // create view treeviewitem
                TreeViewItem viewItem = new TreeViewItem() { Header = viewName };
                // view item add to view type
                ViewTypeDictionary[viewTypename].Items.Add(viewItem);
            }
        }


    }
}
This is the last part of this sample project, after the Dockable Window Implementation, now is the time to deliver and display it in the Revit Application UI. To do so, let’s go back to our Register Command and Show Command classes.


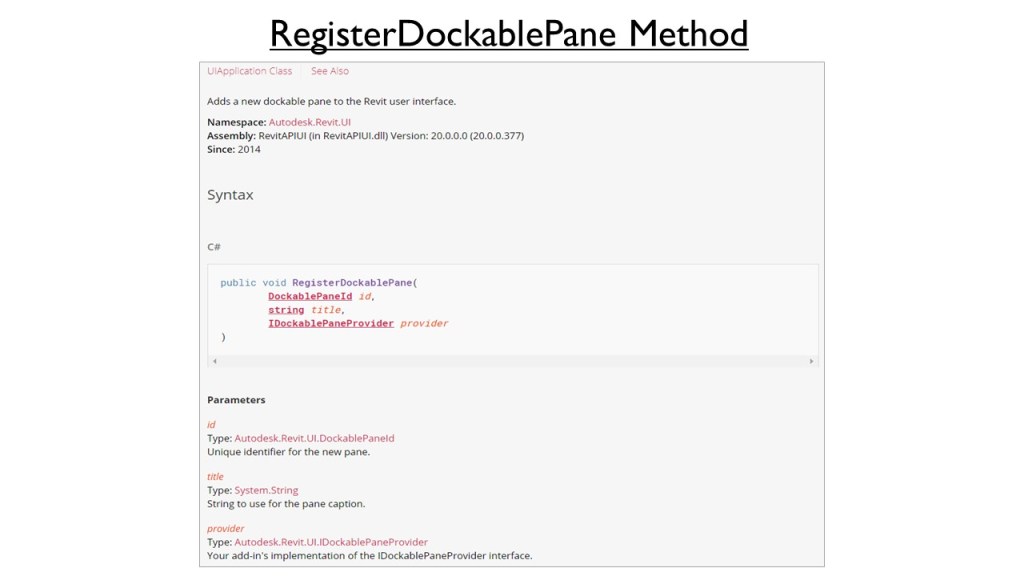

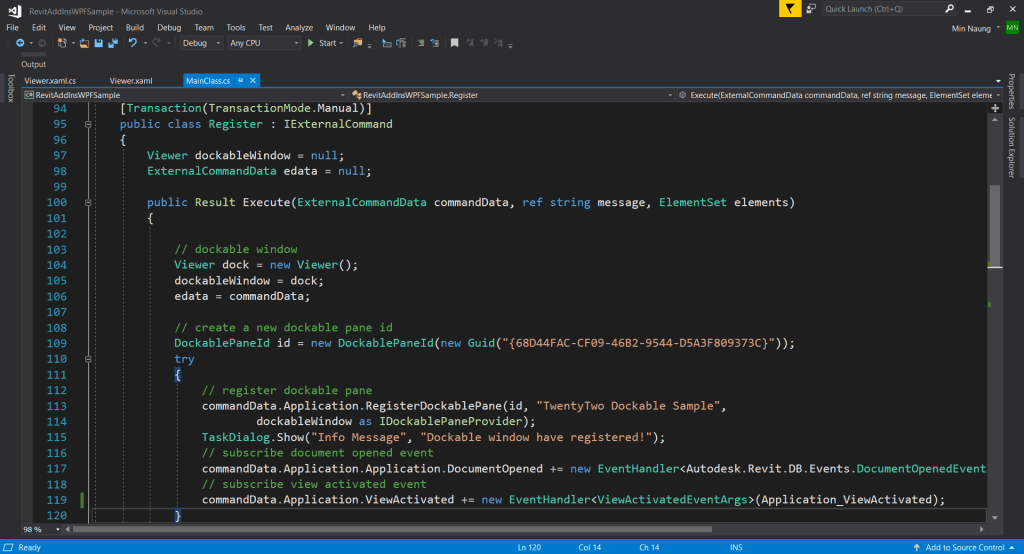
In Register Command Class, assign an instance of the Viewer(), the ExternalCommandData parameter to its associate field values. Create a new DockablePaneId with a GUID, Globally Unique Identifier, you can get it from here. As shown in above slides, RegisterDockablePaneMethod needs three parameters: an Id, a caption and a dockable window. Subscribe Application Events: DocumentOpened and ViewActivated, you can add additional Application Events if you need (figure 1.12).
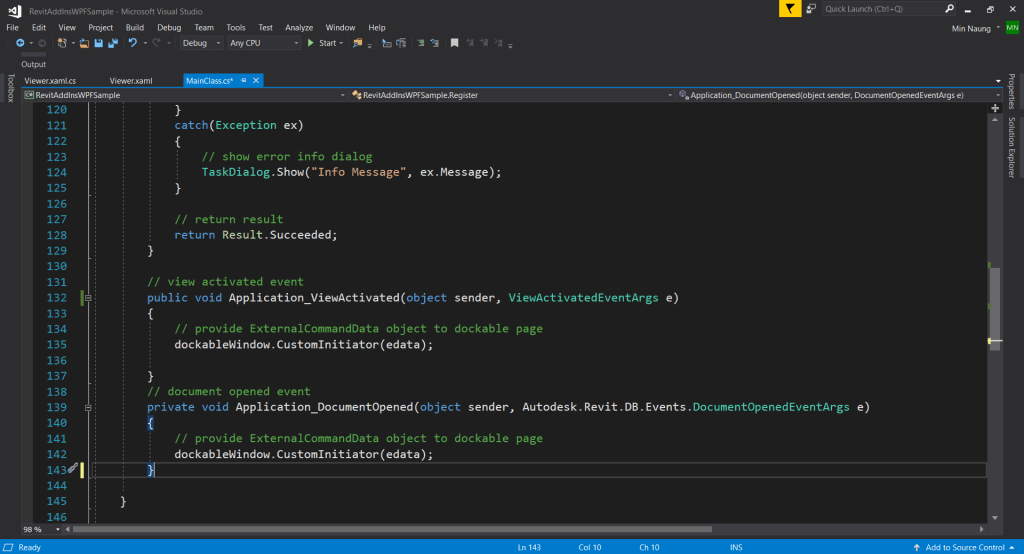
And finally the two event callback methods: Application_DocumentOpened and Application_ViewActivated, both methods call the Viewer‘s CustomInitiator method with the current ExternalCommandData value (figure 1.13).
// external command class
    [Transaction(TransactionMode.Manual)]
    public class Register : IExternalCommand
    {
        Viewer dockableWindow = null;
        ExternalCommandData edata = null;

        public Result Execute(ExternalCommandData commandData, ref string message, ElementSet elements)
        {

            // dockable window
            Viewer dock = new Viewer();
            dockableWindow = dock;
            edata = commandData;

            // create a new dockable pane id
            DockablePaneId id = new DockablePaneId(new Guid("{68D44FAC-CF09-46B2-9544-D5A3F809373C}"));
            try
            {
                // register dockable pane
                commandData.Application.RegisterDockablePane(id, "TwentyTwo Dockable Sample",
                        dockableWindow as IDockablePaneProvider);
                TaskDialog.Show("Info Message", "Dockable window have registered!");
                // subscribe document opened event
                commandData.Application.Application.DocumentOpened += new EventHandler<Autodesk.Revit.DB.Events.DocumentOpenedEventArgs>(Application_DocumentOpened);
                // subscribe view activated event
                commandData.Application.ViewActivated += new EventHandler<ViewActivatedEventArgs>(Application_ViewActivated);
            }
            catch(Exception ex)
            {
                // show error info dialog
                TaskDialog.Show("Info Message", ex.Message);
            }

            // return result
            return Result.Succeeded;
        }

        // view activated event
        public void Application_ViewActivated(object sender, ViewActivatedEventArgs e)
        {
            // provide ExternalCommandData object to dockable page
            dockableWindow.CustomInitiator(edata);

        }
        // document opened event
        private void Application_DocumentOpened(object sender, Autodesk.Revit.DB.Events.DocumentOpenedEventArgs e)
        {
            // provide ExternalCommandData object to dockable page
            dockableWindow.CustomInitiator(edata);
        }


    }
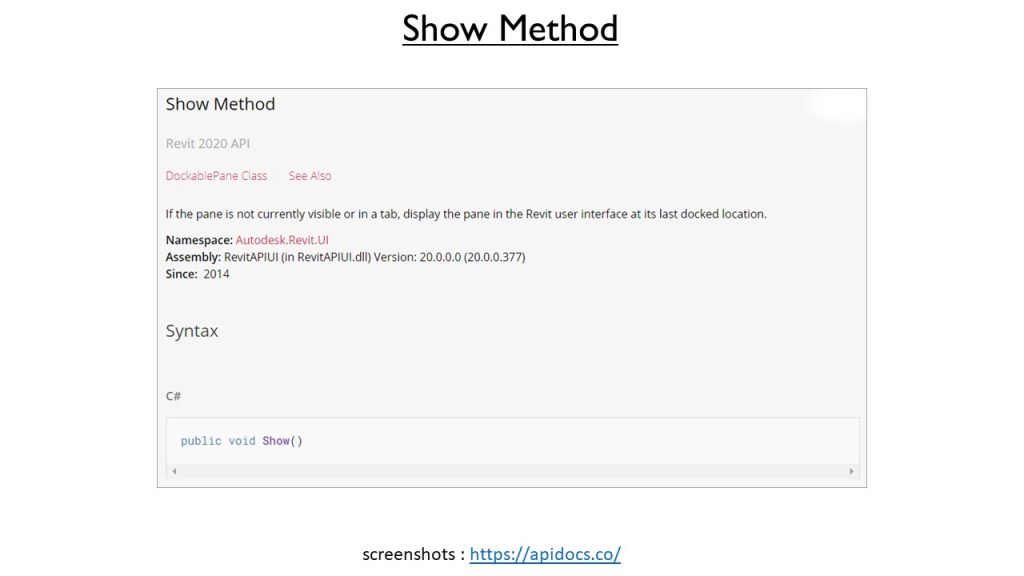
For Show Command Class, all we have to do is, get the registered Dockable Window with the same GUID value was given in the registration and display it with Show() method (figure 1.14).

    // external command class
    [Transaction(TransactionMode.Manual)]
    public class Show : IExternalCommand
    {
        public Result Execute(ExternalCommandData commandData, ref string message, ElementSet elements)
        {
            try
            {
                // dockable window id
                DockablePaneId id = new DockablePaneId(new Guid("{68D44FAC-CF09-46B2-9544-D5A3F809373C}"));
                DockablePane dockableWindow = commandData.Application.GetDockablePane(id);
                dockableWindow.Show();
            }
            catch(Exception ex)
            {
                // show error info dialog
                TaskDialog.Show("Info Message", ex.Message);
            }
            // return result
            return Result.Succeeded;
        }
    }
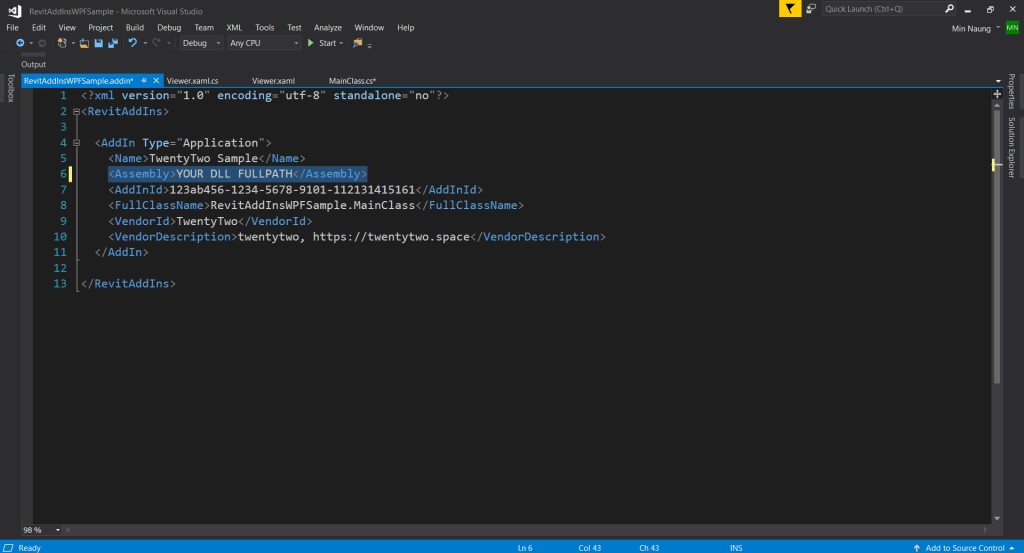
Update the RevitAddInsWPFSample.addin add-ins manifest file as ExternalApplication. <Assembly> needs to provide the full file-path of this current sample project DLL file.
<?xml version="1.0" encoding="utf-8" standalone="no"?>
<RevitAddIns>

  <AddIn Type="Application">
    <Name>TwentyTwo Sample</Name>
    <Assembly>YOUR DLL FULLPATH</Assembly>
    <AddInId>123ab456-1234-5678-9101-112131415161</AddInId>
    <FullClassName>RevitAddInsWPFSample.MainClass</FullClassName>
    <VendorId>TwentyTwo</VendorId>
    <VendorDescription>twentytwo, https://twentytwo.space</VendorDescription>
  </AddIn>

</RevitAddIns>
Setup Debug setting and Pre-Build Event Command Line. (If you have already setup, ignore this). Go to the Solution Explorer > Select the namespace and right-click > Properties . You’ll see windows like the images below. Add Pre-Build Event Command to copy “RevitAddInsWPFSample.addin” to Revit’s system location.

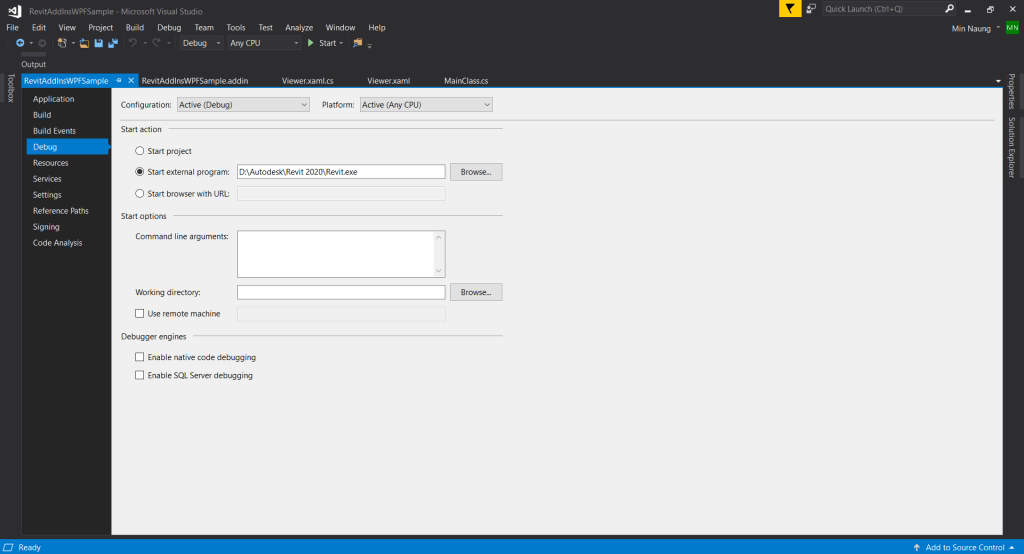
On the Debug tab > setup the Start external program. Press F5 or Click Start to test the project.
Well, that’s all for this sample project. You can download the complete project source code here.
RevitAPI screenshots from : https://apidocs.co
Additional Resources :
https://www.autodesk.com/developer-network/platform-technologies/revit
https://thebuildingcoder.typepad.com/blog/2013/05/a-simpler-dockable-panel-sample.html

dear min,
thanks for the article, i havent tried the code yet but before i do i was wondering, is it possibe to open revit views in your dockable pane?
greetings Coen
LikeLike
Hi Coen,
Welcome. Items in the pane are view names with no mechanism behind so can’t be opened.
LikeLike
Hi Min,
Register dont work, please help!
LikeLike
Hi Cesar, would you be more specific? Are you following each step correctly?
LikeLike
Dear Min,
thank you for the interesting article. I am at the beginning of C# and Revit API and I am still learning. I changed the treeview to a combobox. I wonder if there is a way to pass a variable -comboBox.selectedItem to another class. I want to send selected WallType to another AddIn. When I click on that AddIn, a new wall of that type will be created. I googled whole internet and still I do not know how to pass that variable. I tried static statements, properties, constructors, helper class with constructor… Maybe I just implemented it wrong. Any hint would be appreciable.
LikeLike
Hi Tomas,
Thanks. You can take a look at External Event : https://help.autodesk.com/view/RVT/2021/ENU/?guid=Revit_API_Revit_API_Developers_Guide_Advanced_Topics_External_Events_html
which can implement and uses for asynchronous processing in add-ins.
LikeLike
Hi, great article! I have developed a Proof of Concept where I was drawn to the use of dockable panel. I started off with the “old” sample from Jeremy Tammik. Got it working. one of the downfalls for me is I never used WPF, and I still have struggles handling that. However, I have a question. Do you know of any resources for a look alike Revit Properties window, just like you did with the tree-view like dockable panel, which looks very nice.
And question number two. One of the drawbacks using dockable panels is it beeing outside Revit context and exentsive use of External events handling. I struggle since I might have to call more than one external event from one fuction relying on one finishing before the other can execute, and external events are not fired in the order of execution in my code. They are always executed at the end of a function, and not even necessarily in the right order if I call two of them. This leads to some workarounds that are not so nice, and sometimes hard to handle at all. using global variables to test this and that. Not sure if I do things wrongly, or if this is just how it is, and nothing to do about it. Any tip?
LikeLike
Hi Henning,
Q1: i think, you can create with DataGrid Control and embed in your Pane window.
Q2: Yes, i know your struggle and I can give you some advice. Download Revit SDK and study ModelessForm_ExternalEvent sample.
LikeLike
Hello, I believe in your CommandAvailability class the comments are
backwards for the register button.
if the ActiveUIDocument is null then we are returning true, the button should be enabled.
LikeLike
Hi Luis, logic for this class is “if no ActiveDocument (null), disable the register button”.
LikeLike
Im just trying to get this right…
so if the ActiveDocument is null, our register button should be enabled because we have to use it in a Zero document state.
LikeLike
Yes, Luis.. you are right. If null, return true (enable register btn).
LikeLike
Thank you this post was really helpful! I am just learning to code.
More posts like yours are needed!
LikeLiked by 1 person
Can you explain how you built the treeview?
I don’t get how the view name ended up being a child of the View type.. I am just learning C Sharp.
LikeLike
Its in the last part ” DisplayTreeViewItem ” method,
// create view treeviewitem
TreeViewItem viewItem = new TreeViewItem() { Header = viewName };
// view item add to view type
ViewTypeDictionary[viewTypename].Items.Add(viewItem);
LikeLike
Hi,
Nice script!
It is possible to use the script without the register button?
Kind Regards,
Jan Willem
LikeLike
Hi Jan, yes possible.. there’ll be another tutorial soon.
LikeLike
Hi Min Naung,
Sounds good!
LikeLiked by 1 person
There you go .. : https://twentytwo.space/2023/02/21/dockable-window-revit-add-ins-new-edition/
LikeLike