Welcome to the tenth tutorial of Navisworks® API series, this post is to cover a different type of Plugin called “CommandHandlerPlugin”, which can be used to add commands to the Navisworks GUI system. In this tutorial, we will create a custom RibbonTab layout for RibbonButton & SplitButton commands.
Let this start by firing up Visual Studio (me using VS17 & Navisworks 2020), when you are ready, create a new project > choose Class Library (.Net Framework) and name it “CustomTabSample” (figure 1.1).

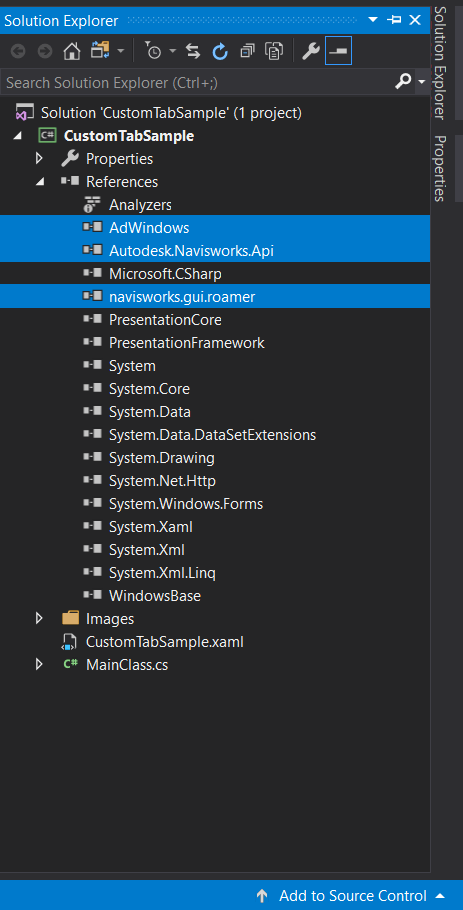
In the Solution Explorer panel, right-click on References > Add Reference > Browse and add AdWindows, Navisworks GUI Roamer, Navisworks API library and WindowForms too (figure 1.2).

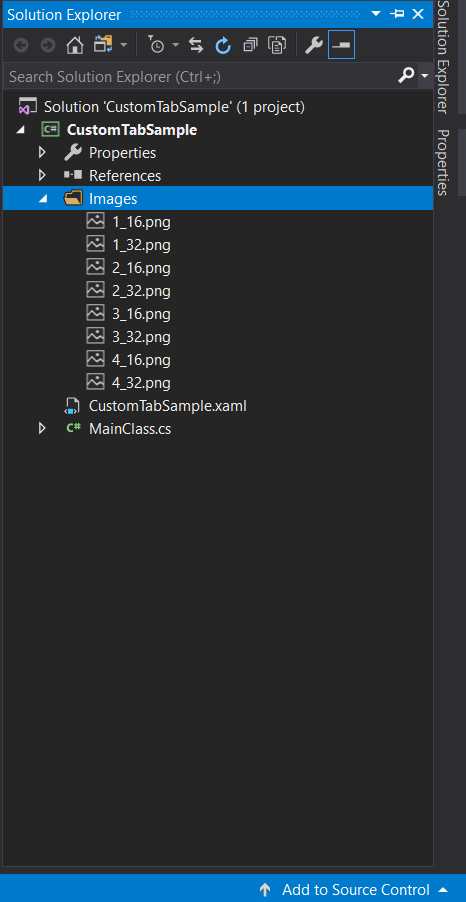
In the Solution Explorer you should be seeing the References as below figure 1.3a , make sure local copy values set to false. And create a Folder name it “Images” for icon/images as shown in figure 1.3b (get images from GitHub repo).
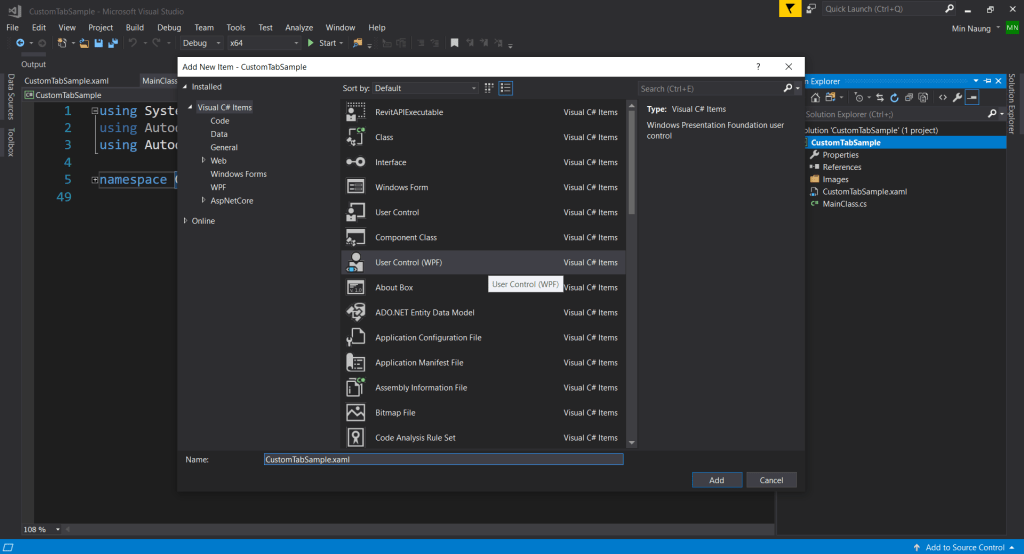
Add a new WPF User Control (XAML file) , the Ribbon Interface file to configure RibbonTab layout (figure 1.4).
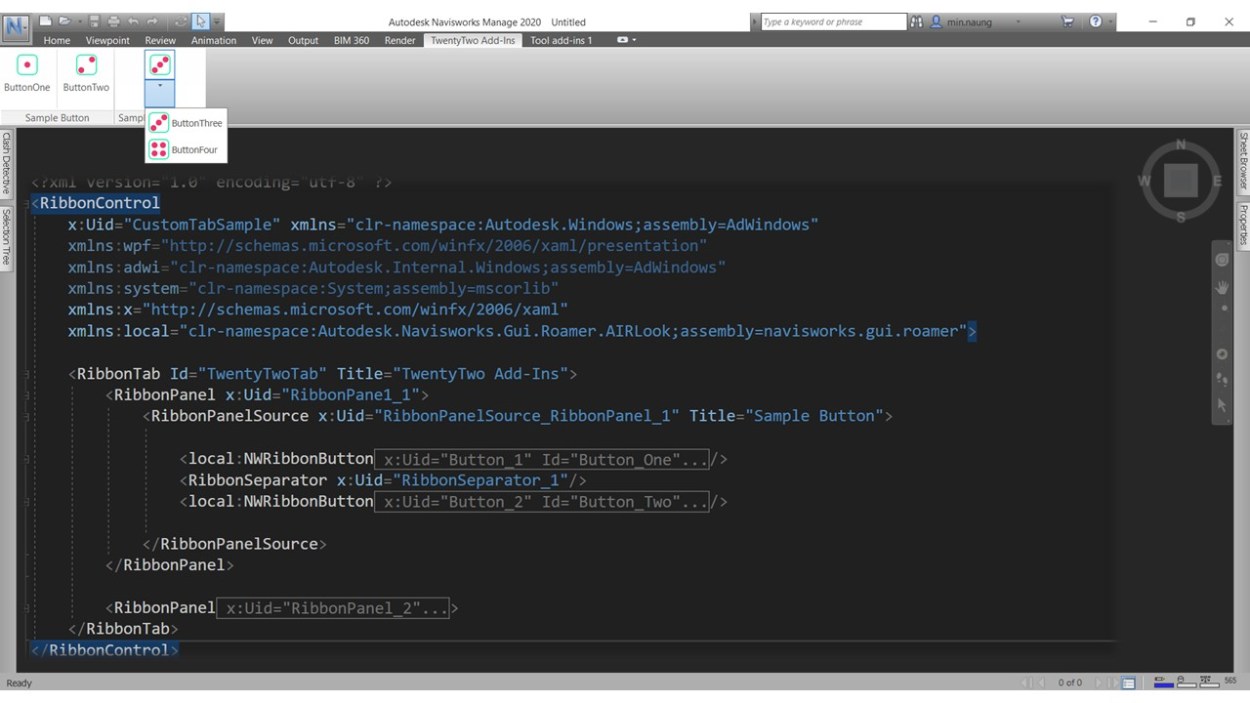
Remove all the preset tags from our xaml file and delete CustomTabSample.xaml.cs file too. In RibbonControl tag, we’ll give x:Uid as the project name “CustomTabSample” and also need to add AdWindows, Naviswork GUI Roamer as assembly references. (figure 1.5a)
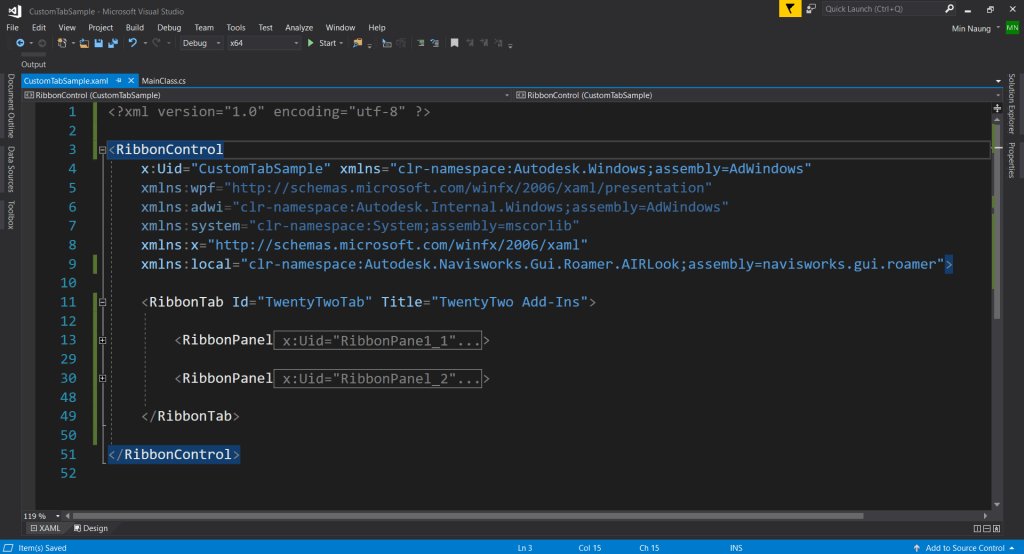
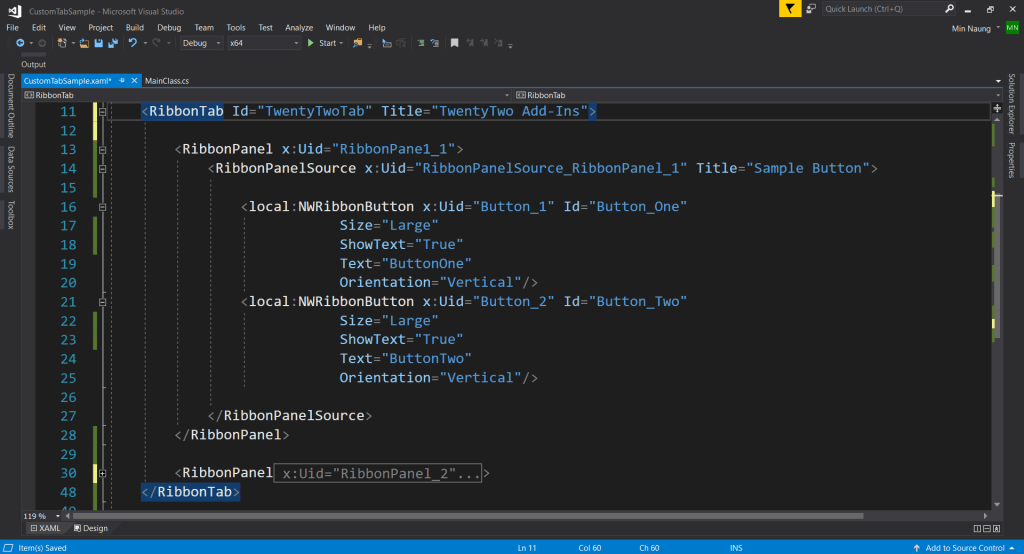
RibbonTab defines a tab on the ribbon, set Id and Title attributes values as shown in figure 1.5b. RibbonPanel provides a distinct panel in the ribbon tab for a group of buttons and set x:Uid attribute value as “RibbonPanel_1”. RibbonPanelSource defines the content and properties of the parent RibbonPanel and NWRibbonButton indicates a button in the ribbon. We have two buttons: “ButtonOne” and “ButtonTwo” in the “RibbonPanel_1”. (figure 1.5b)
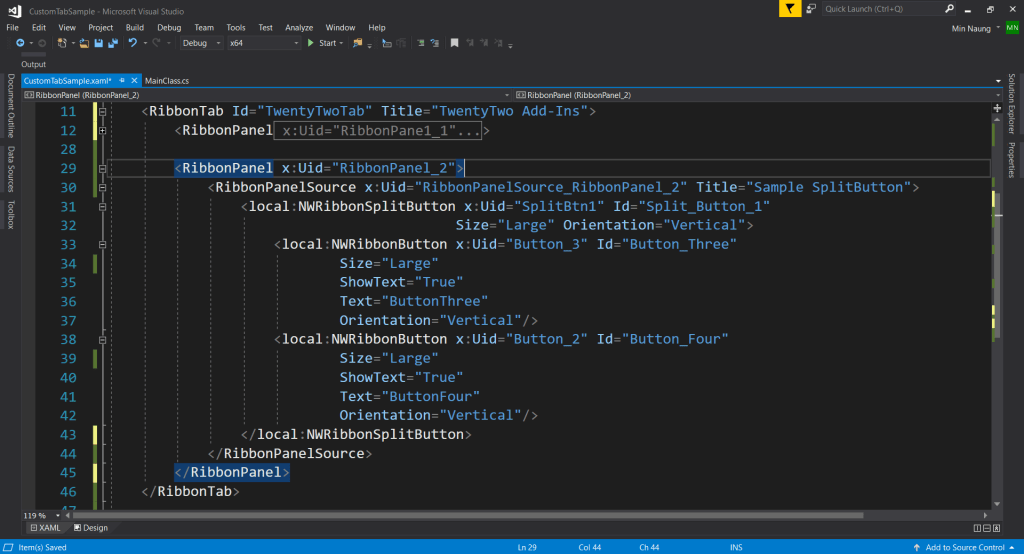
In “RibbonPanel_2” we will add a Split Button, NWRibbonSplitButton, which holds “ButtonThree” and “ButtonFour” (figure 1.5c). Now, we are done with our xaml file.
In MainClass.cs , we need to add a list of class attributes : Plugin attribute is to defines PluginID, DeveloperID. RibbonLayout attribute is to identify our “CustomTabSample.xaml” XAML file. RibbonTab attribute must provide the same RibbonTab’s Id from our xaml file. We have a Command attribute for each Button and Command Id links to Button Id. (figure 1.6)

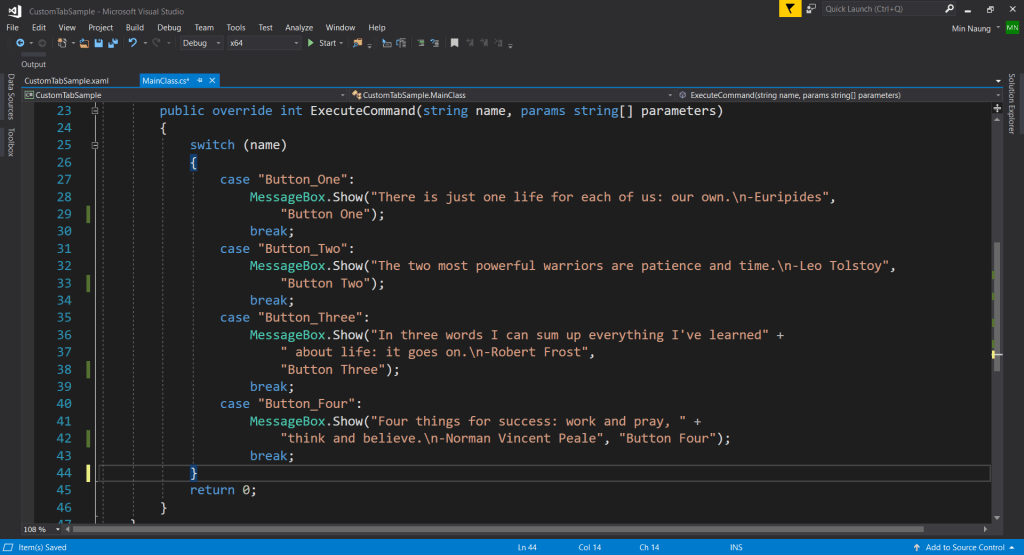
CommandHandlerPlugin the derivative class has ExecuteCommand method to override. Method execute when a button in the Ribbon is pressed. (figure 1.7)

In ExecuteCommand method, we have a simple switch case statement for Button’s Id to determine which Button is pressed and a quote message box will display. (figure 1.8)
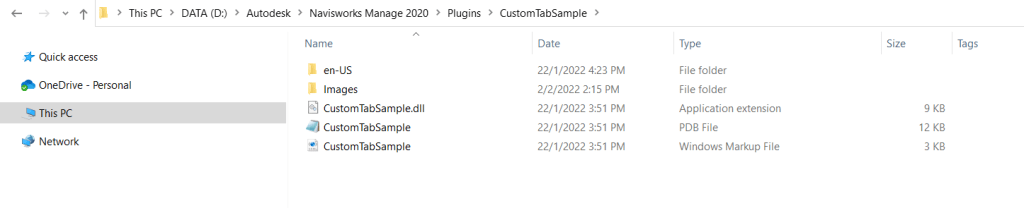
Lastly, to make our Plugins’ folder structure, as shown in figure 1.9, we’ll add a few Post-build Event Command Lines to copy Folder & Files.
In Build Events tab, edit Post-build event. (figure 1.10)
The first line : xcopy /Y "$(TargetDir)." "D:\Autodesk\Navisworks Manage 2020\Plugins\$(Target Name)\" – to copy the output dll file.
Second line : xcopy /Y "$(ProjectDir)CustomTabSample.xaml" "D:\Autodesk\Navisworks Manage 2020\Plugins\$(TargetName)\" – to copy xaml file.
Third line : mkdir "D:\Autodesk\Navisworks Manage 2020\Plugins\$(TargetName)\en-US" – to create a new folder “en-Us”.
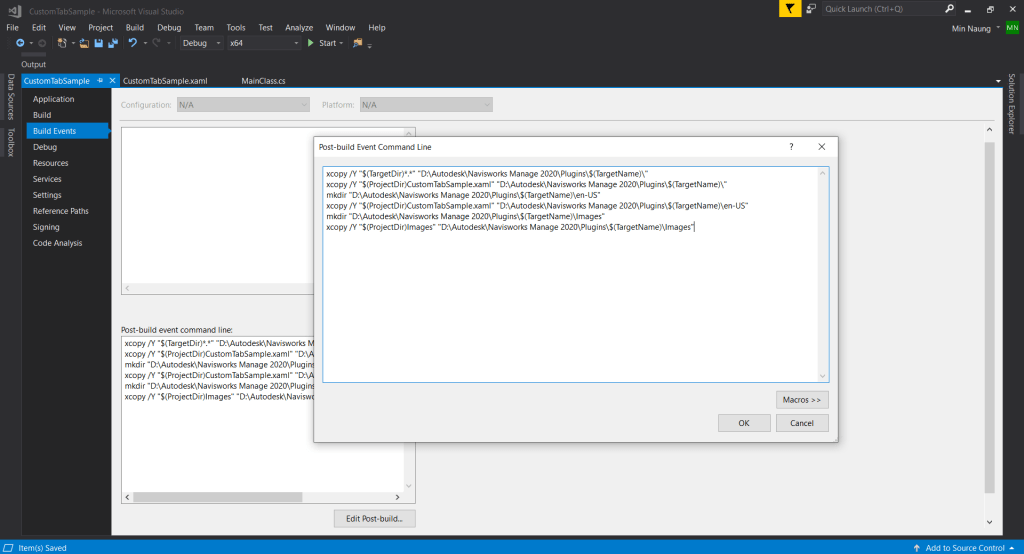
Fourth line : xcopy /Y "$(ProjectDir)CustomTabSample.xaml" "D:\Autodesk\Navisworks Manage 2020\Plugins\$(TargetName)\en-US" – copy xaml file to “en-US” folder.
Fifth line : mkdir "D:\Autodesk\Navisworks Manage 2020\Plugins\$(TargetName)\Images" – create a new folder “Images”.
Sixth line : xcopy /Y "$(ProjectDir)Images" "D:\Autodesk\Navisworks Manage 2020\Plugins\$(TargetName)\Images" – copy imported images to “Images” folder.
Finally, change the platform solution to x64, add external program to Navisworks’ Roamer.exe and click Start.

That’s all for this tutorial, you can get the complete source code from here, Cheers!
Project File : Autodesk Navisworks Sample File.
Additional References :
https://apidocs.co/apps/navisworks/2018/87317537-2911-4c08-b492-6496c82b3ed5.htm
https://adndevblog.typepad.com/aec/2012/07/custom-ribbon-of-navisworks-part-1.html

Hi MIN.NAUNG,
Thanks for this helpful article. I study Navisworks API from your website. You provide a very good example.
LikeLike
Hi, I learn a lot from your posts. Thanks.
My question is that where to write the business code of each button. Should it be written under ExecuteCommand?
LikeLike
Hi Bingyong, thanks. You can write a separate class/method and then call from ExecuteCommand.
LikeLike
I’m surprised you were able to reply to me so quickly. Thanks again. I will have a try.
LikeLike