
Welcome to the twelfth tutorial of Navisworks® API series, this post is to cover how to add the Timeliner Tasks to the document Timeliner object. In this tutorial, we will create the Timeliner Tasks, from the predefined SelectionSets, with primary properties such as .. Start/End Date, TaskType and Attached (SelectionSet) for the Timeliner Simulation. (something like Auto-Add Task > For Every Set command)
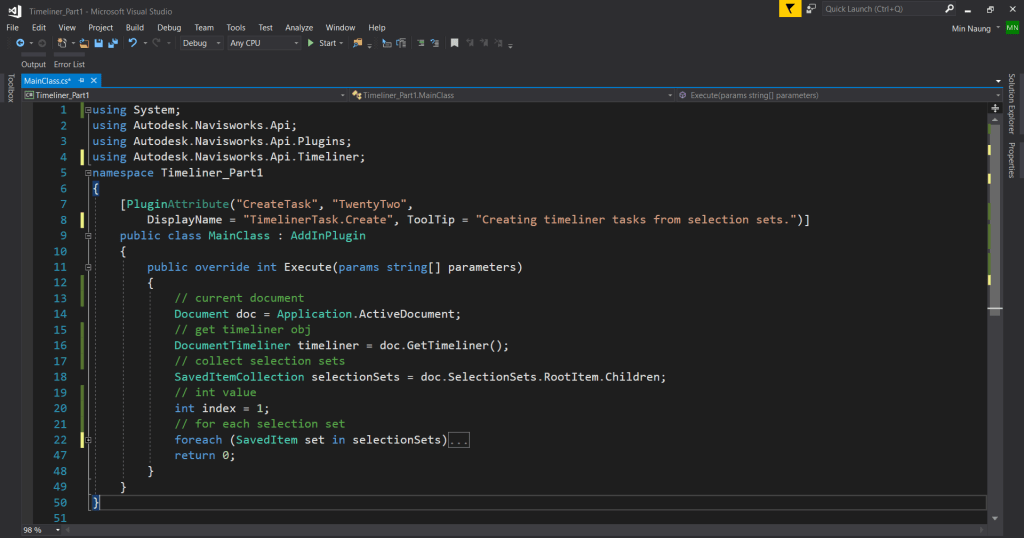
Setting up Navisworks® Add-Ins project in the visual studio, you can follow Creating Navisworks Add-Ins tutorial to set up the project. When you are ready, in the Execute method, we are going collect the Timeliner object and (saved)SelectionSets from the current document. GetTimeliner method can use to collect the Timeliner object and from SeletionSets property we are able to collect SavedItemCollection, represents a collection of SavedItems and appears in the various classes relation to SelectionSets. (figure 1.0)
The next step is to loop each of the collected SelectionSets to create the TimelinerTasks. Create each TimelinerTask via the TimelinerTask constructor with primary properties : DisplayName – set DisplayName value from SelectionSet DisplayName, Start/End Date – set DateTime object with year, month and date. (For the sake of simplicity, incrementation of 1(index) assign to month). And for SimulationTaskTypeName is “Construct” (you can assign default types such as “Demolish”, “Temporary”). (figure 1.1)
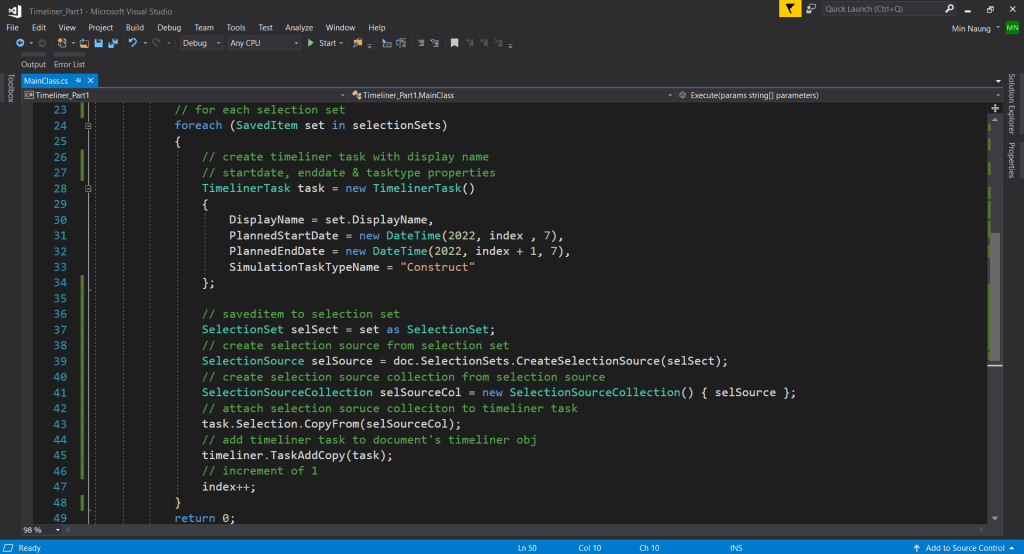
And we have to make a bunch of TypeConversion to attach SelectionSet to the TimelinerTask’s Attached property. SelectionSet to SelectionSource, from SelectionSource to SelectionSourceCollection then we uses Selection property to attach (SelectionSet) to the TimelinerTask and lastly, the TimelinerTask add to the Timeliner object. (figure 1.1)
We’ll add Post-build Command line for debugging purpose. (figure 1.2)
In Build Events tab, edit Post-build event : xcopy /Y "$(TargetDir)." "D:\Autodesk\Navisworks Manage 2023\Plugins\$(TargetName)\" – to copy the output dll file.

Finally, add external program to Navisworks’ Roamer.exe and click Start. (figure 1.3)

That’s all for this tutorial, you can get the complete source code from here, Cheers!
