
Welcome to the second tutorial of Revit API series, this post is to cover a new interesting topic called Extensible Storage which allows you to create Schema data structures and attach to any Element in a Revit model. In this tutorial, we will write two ExternalCommand Revit Add-Ins, for creating and getting Schema.

You can follow the first part of this tutorial to setup the project. After setting up your project, as shown in figure 1.0, we’ll create two class for our two ExternalCommand add-ins, the first one is for creating a Schema and attach its instance to an Element, the latter is for retrieving Schema from the assigned Element.

Let’s start with CreateSchemaClass, in Execute method the first thing we do, is to collect an Element for later to attach our Schema data. UIDocument has Selection property to collect the current selected Elements’ Ids and from this return list of Ids value, take the first (index) Element. (figure 1.1)

As stated in Revit documentation, the following steps are necessary to store data with Elements in Revit:
- Create and name a new schema
- Set the read/write access for the schema
- Define one or more fields of data for the schema
- Create an entity based on the schema
- Assign values to the fields for the entity
- Associate the entity with a Revit element

SchemaBuilder is used to create Schema by providing a GUID as a parameter value which is used to identify the Schema and named it “MySchemaName” by using SetSchemaName method. For the read and write access levels of Schema, there are three options : Public, Vendor, or Application. If either the read or write access level is set to Vendor, the VendorId of the third-party vendor must be specified and if either access level is set to Application, the GUID of the application or add-in must be supplied too.
A simple field can be created using the SchemaBuilder.AddSimpleField() method to specify a name and type for the field (multiple fields are supported) and you can set field’s documentation with SetDocumentation method. After all fields have been defined for the schema, SchemaBuilder.Finish() will return the finished Schema.

An Entity is a instance of Schema, a new Entity can be created using that schema. For each Field in the Schema, the value can be stored using Entity.Set(), which takes a Field and a value (type must follow the defined field type), we set field value to “Hola Amigo!”. After Field value has been set for the entity, it can be assigned to an element using the Element.SetEntity() method. Finally, just to display a TaskDialog for assigned Element info (can omit too). That’s the end of first part, creating Schema. (figure 1.2)
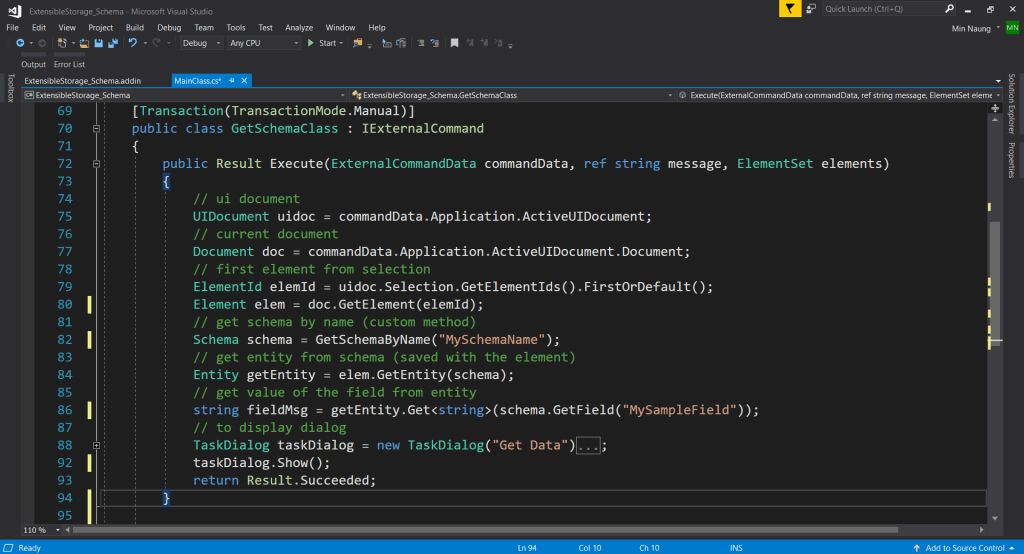
In GetSchemaClass’s Execute method, the first a few lines are the same for collecting the first Element from the current selection. And we write a custom method for collecting Schema by Name, GetSchemaByName (figure 2.1).
To retrieve Schema data (Entity) from the assigned Element, call Element.GetEntity() with providing Schema as a parameter and its return Entity. If no entity based on that schema was saved with the Element, an invalid Entity will be returned. To retrieve our stored Field value from the entity can be obtained using the Entity.Get() method with a FieldName. Finally, just display the collected Field Value from the Element’s entity.

Well that’s all for this tutorial, you can find the complete source code here, Cheers!!

Great tutorial Min, It would be awesome a tutorial about Revit Dynamic Updaters from you, there is no much stuff about it on the web, I’ve been trying to implement some DMUs using ironpython but I have had not fortune with that.
Thanks from Mexico!.
LikeLike