
This is a new edition of DockableWindow post, the previous post is here. In the previous post, we have to register our DockableWindow during zero document stage and, after the document loaded, display the window by executing a command button. In this edition, we will register our DockableWindow while Revit® Application is starting/launching and display the window by executing a command button. We will create a Dockable WPF Control hosting a Web Browser and showing twentytwo.space website.
The IExternalApplication interface has two abstract methods, OnStartup() and OnShutdown(), Revit calls OnStartup event method when it starts/launches, we will register our DockableWindow in this event method, and calls OnShutdown event method when it closes.

This time we only have to create Show UI button and attach it to Show Command. In the OnStartup event method, to do the following steps;
- Create a Ribbon Panel name “TwentyTwo Sample” under Revit Add-Ins Tab.
- Get current assembly path which is the location of this current project’s DLL file.
- Create a button for Show Command and add to the created “TwentyTwo Sample” panel.
- Assign ToolTip and Images properties respectively.
- Register Dockable Window (figure 1.0)
GetResourceImage method, to collect our image files that we just embedded in this current assembly resource file for Show command button. This method includes two parameters : (Assembly) an assembly , (string) name of an image and returns an ImageSource object. (figure 1.1)

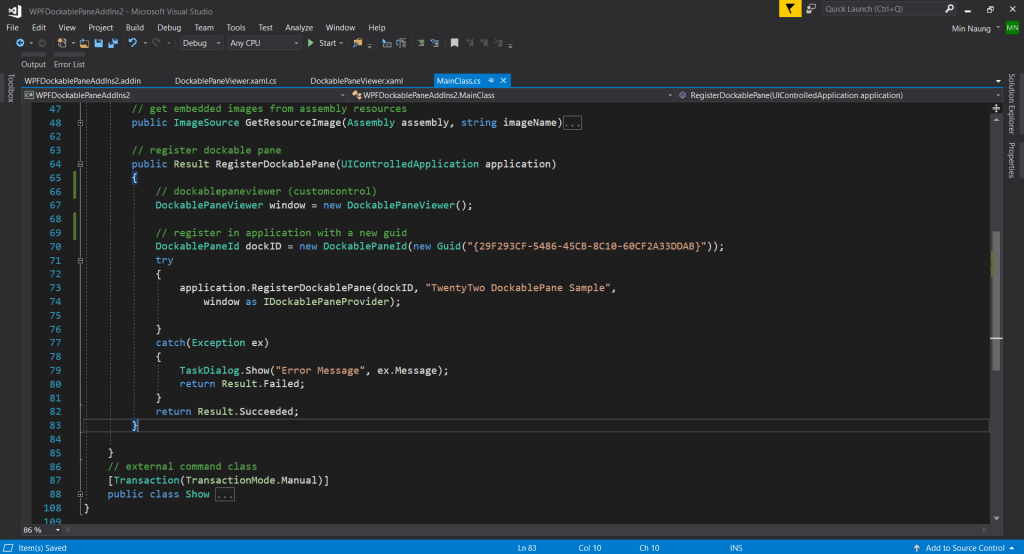
In RegisterDockablePane method, assign an instance of the DockablePaneViewer() to a field and create a new DockablePaneId with a GUID, Globally Unique Identifier, you can generate and get a number from here. RegisterDockablePane method needs three parameters: an Id, a caption and a dockable window. (figure 1.2)
In Show command class, get the registered Dockable Window with the same GUID value was given in the registration method and display it with Show() method (figure 1.3).

Add new item > Select User Control (WPF) and name it “DockablePaneViewer.xaml”. (figure 1.4)

Change the Window to Page tag as recommended in Revit API Developer Guide . And just have to add a WebBrowser tag with Name and Source (a webpage to navigate and display). (figure 1.5)

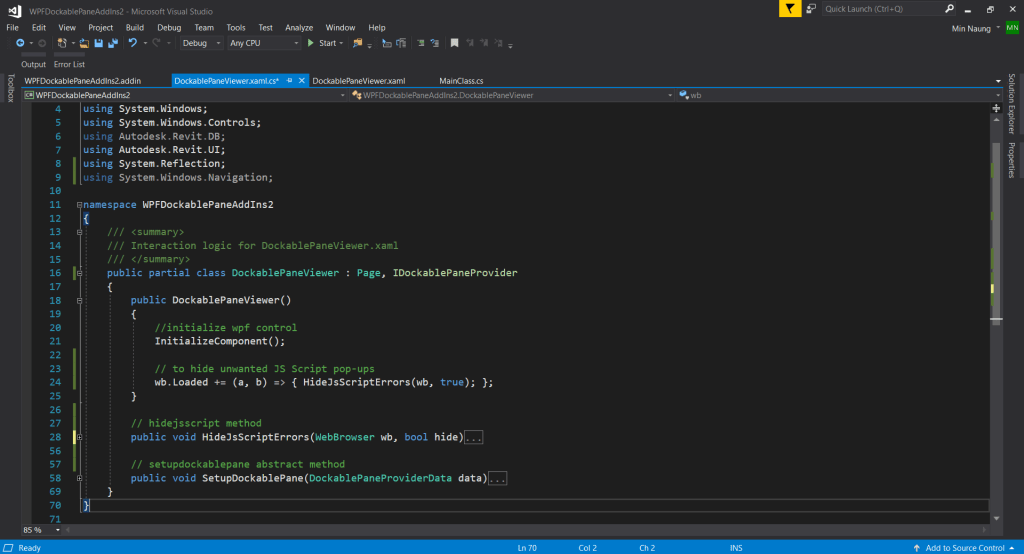
In DockablePaneViewer.xaml.cs , we’ll subscribe WebBrowser’s Loaded Event with a callback method to hide unwanted JavaScript pop-up dialogs while web page loading. Implementation of the IDockablePaneProvider interface and its abstract method named SetupDockablePane. SetupDockablePane() method has one parameter of type DockablePaneProviderData, which is a container for information about our dockable window. And we’ll set FrameworkElement and Initial State of its properties. (figure 1.6)
This callback, HideJsScriptErrors, method silent unwanted pop-up script errors (figure 1.7)

In Build Events tab, edit Pre-build event : xcopy /Y "$(ProjectDir)WPFDockablePaneAddIns2.addin" "$(AppData)\Autodesk\Revit\Addins\2023" – to copy the AddIn manifest file, “RevitAddInsWPFSample.addin”, to Revit’s system location. (figure 1.8, 1.9)


That’s all for this tutorial, you can get the complete source code from here, Cheers!

It looks interesting, but have you tried using it to open two documents in Revit at once, like opening or editing a family or opening two Revit projects in one session? I believe Revit will crash.
LikeLike
Hi Jobabam, Revit won’t crash but DockableWindow/WPF Control becomes unstable and raised an error by displaying a blank window.
LikeLike
Thanks!
LikeLike
Nice tutorial Min.Nuang, it really helped me getting a dockable addin done myself.
Thanks a lot!
LikeLike
You’re Welcome!
LikeLike
Thank you for the example. Like @Jobabam, opening two different documents in the same session will crash Revit. While you mention not directly, still the WPF issue or related ultimately leads to Revit crashing. With that said, any ideas or solutions on how to resolve this? Do we ultimately have to close the dock every time we open up a new document?
LikeLike
I believe if you have implemented as Modeless and/or ExternalApplication (not only referencing one particular Revit session, maybe any active Revit session), Revit won’t crashed.
LikeLike
Min,
Using this example I am testing different elements I could utilize within the dockviewer, specifically the DockablePaneViewer.xaml. For a basic test, I commented out the WebBrowser, leaving the grid empty for simple debugging sake. The application loads just fine in Revit and the dock shows up in the UI with an empty black screen as expected. However, once I close Revit a few seconds later it is followed by the “Revit cannot run the external application….” error. Any idea why this is coming up? OnShutdown includes the disposal of the dockId as shown in the example. Is there something that needs to be disposed for an empty DockablePaneViewer.xaml? Please let me know. Thanks.
LikeLike
I may have resolved it by referring to C16ISO3000-ebmarah-ranga in the API.
LikeLike
It works properly, but the problem is when I’m trying to access a button created inside the Main button after InitializeComponent(); method there is no access on it and the external applicaion gives an error and not starting my app.
LikeLike